Orders Designer
Orders Designer is used to create, edit, delete, inactivate, or reactivate orders templates for physicians and anesthesia.
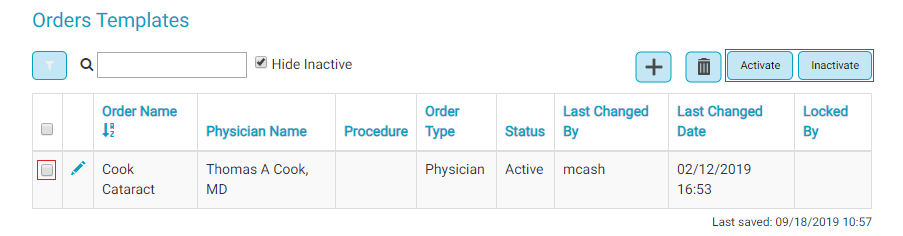
In Orders Designers for each order the user can see:
- The order name
- To which physician (if any) the orders belong
- The procedure preference cards that use the orders
- Whether the order is for anesthesia or a physician
- If the orders are active or inactive
- The last user to edit the orders
- The last date the orders were edited
The Orders Designer is located in HST eChart in Admin Home.
This topic will cover:
Create an Orders Template from Scratch
Create a New Orders Template by Copying an Existing
Inactivate or Activate Orders Templates

Filter and Search Templates
The search bar  at the top left of the grid searches orders templates by physician name.
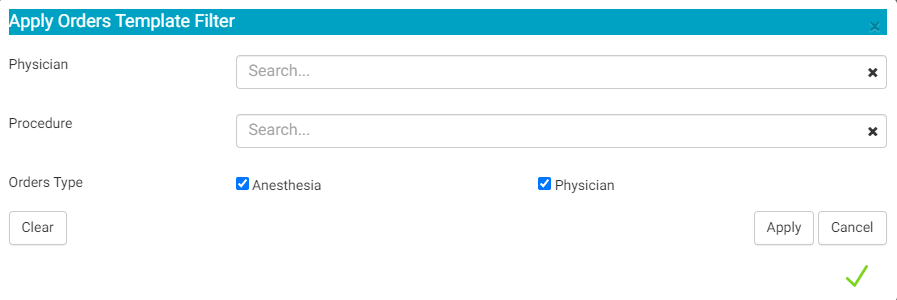
The filter button  filters all order templates based on the selected parameters. Results may be filtered by Physician, Procedure, or whether the order template is for physician or anesthesia orders. When filtering by physician, order sets which are not "owned" by the physician but are used on one of their preference cards will also display. The Procedures column lists the cards on which the orders are present.
Tapping on the Order Name, Physician Name, Order Type, Status, or Last Changed By grid headers will sort the grid in ascending or descending alphabetical order.
Create an Orders Template from Scratch
To create a new order template:
- Tap the Add button
 at the upper right-hand side of the Orders Templates page. A blank Orders Template will load.
 - Enter the desired order template name in the text field to the right of Order Name.
- Select the appropriate radio button for Anesthesia or Physician. If the order template is for a physician, enter the physician name in the search field below the radio button.
- Enter Medication and/or Written orders following the steps below for each.
- Once entered, the arrangement of orders can be changed by dragging and dropping an order to the desired location.
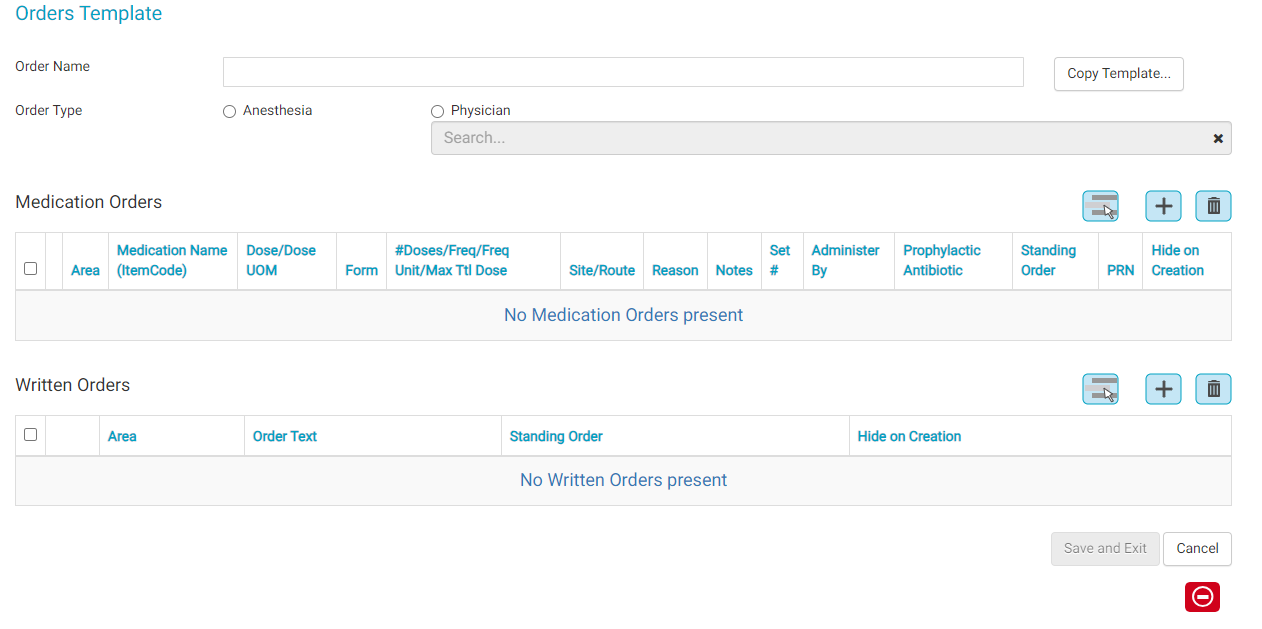
Add a Medication Order:
- Tap the "Add A New" button at the top of the Medication Orders grid. The Add Medication Order flyout will appear.
- Complete the flyout fields as desired. The only fields required are Area and Medication, though including additional details are often beneficial.
- Once complete, tap the "Save" button.
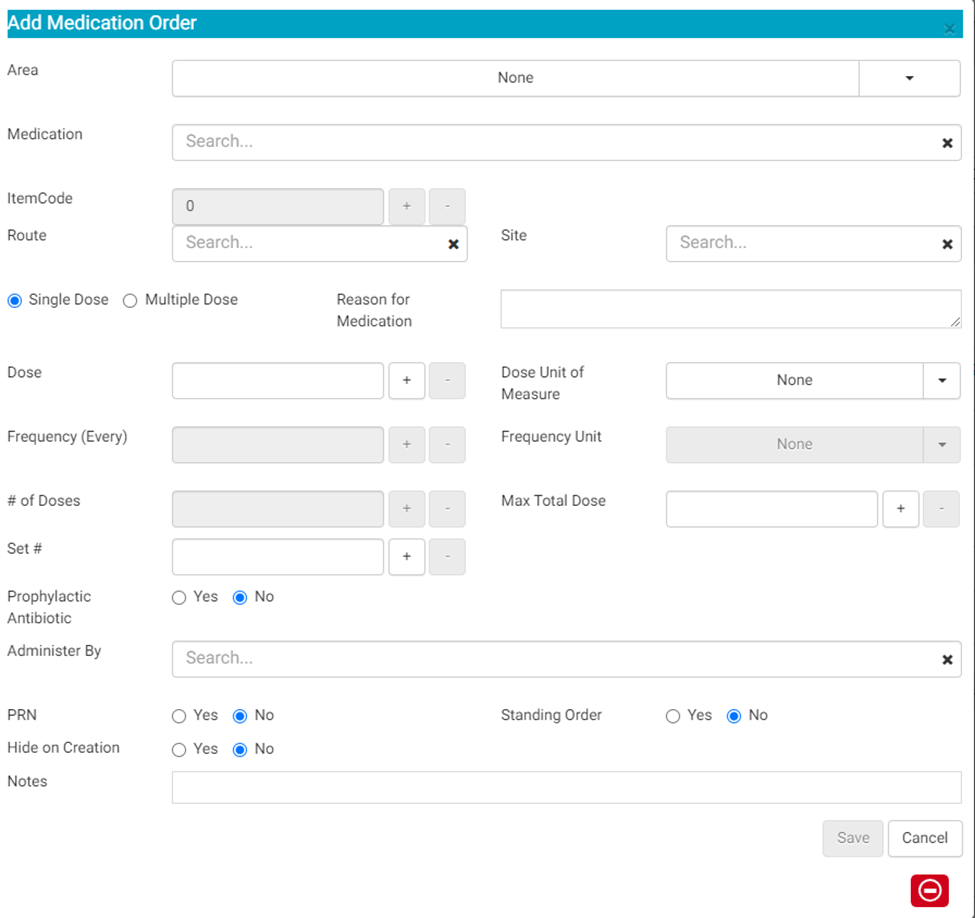
Area: From the drop-down menu, select the clinical Area for which the order will apply.
Medication: Search for the medication in the search box. Medications are populated from the Item Master function in HST Practice Management.
ItemCode: The ItemCode field will automatically fill once the medication has been selected.
Route: Search for the desired route in the search box. Routes are populated from Code Table Maintenance in HST Practice Management. The selected route will display in the Anesthesia Orders BLOC 129, Physician Orders BLOC 128, Prophylactic Antibiotic Administration BLOC 083 and Medication Administration BLOC 036.
Site: Search for the desired body site in the search box. Routes are populated from Code Table Maintenance in HST Practice Management. The selected route will display in the Orders, Prophylactic Antibiotic BLOC and Medication Administration BLOCs.
Single Dose/Multiple Dose: This is a radio button group that allows the user to select whether the order will be for a single dose of medication or a medication that will be given more than once. If Multiple Dose is selected, the Frequency, Frequency Unit, and # Doses fields are activated for use.
Reason for Medication: This is free text field where a reason for the medication can be entered.
Dose: Type the desired dose. The dose may be an integer or a decimal.
Dose Unit of Measure: Select the appropriate unit of measure from the drop-down menu. The drop-down menu is populated from Code Table Maintenance in HST Practice Management.
Frequency: This field is only active for use if Multiple Dose is selected. The user can enter how often (number) the medication can be given. It is used in conjunction with the next field, Frequency Unit. This field is an integer.
Frequency Unit: Used in combination with the frequency field, this is a unit qualifier for how often a medication can be given. Ex. using the combination of these two fields, user can indicate that the medication can be given every 5 minutes. This field is a drop-down selection with the hard coded values Minute(s), Hour(s), Day(s). This field is only active when Multiple Dose is selected.
# of Doses: Enter the total number of desired doses that may be given of the medication. This field is only active when Multiple Dose is selected. The entry must be an integer.
Max Total Dose: If desired, a max total dose can be entered here. This field can be used for either Single or Multiple Dose. The Dose Unit of Measure is the same unit selected as the individual dose. Thie field can have an integer or decimal entry.
Set Number: Sets are groups of medications that are given together more than once, i.e. three different eye drops that are given 3 times 5 minutes apart in pre-op. When medications are designated as a set, they can be administered and reloaded more easily in the Medication Administration BLOC.
Prophylactic Antibiotic: Select the appropriate radio button to indicate if the order is for a prophylactic antibiotic. If Yes is selected, the order will populate the Prophylactic Antibiotic Administration BLOC 083.
Administer by: If the medication will always be administered by the same individual, their name can be entered in the search field. This is very useful for medications distributed to the surgical field that are always administered by the physician.
PRN: If the order is PRN, select the Yes radio button.
Standing Order: If the order is a Standing Order, select the Yes radio button. Orders should not arbitrarily be marked as Standing. The Center should have a Policy and Procedure for approving Standing Orders. CMS requires Standing Orders be based upon nationally recognized evidence-based guidelines. In addition, there are often state level regulations. Ensure that any order marked as Standing is compliant with relevant policies, procedures, and regulations. Generally, Standing Orders apply to all patients that meet the specified criteria. They are considered signed and executable. As such, Standing Orders cannot be hidden and should not be edited within a chart after the patient's arrival as the staff may have already completed the order as originally written.
Hide on Creation: Selecting the Yes radio button will hide the order when the chart is created. Hidden orders can be viewed at any time by tapping the Show Hidden Orders button in the Physician or Anesthesia Orders BLOCs. The desired order can then be signed, and the remaining orders can be hidden again.
Notes: Enter any additional notes as desired. These notes will be visible from the Anesthesia Orders BLOC 129, Physician Orders BLOC 128, Prophylactic Antibiotic Administration BLOC 083, and Medication Administration BLOC 036 as applicable.
Add a Written Order:
- Tap the Add button at the top of the Written Orders grid. The Add Text Order flyout will appear.
- Complete the flyout fields as desired.
- Once complete, tap the "Save" button.
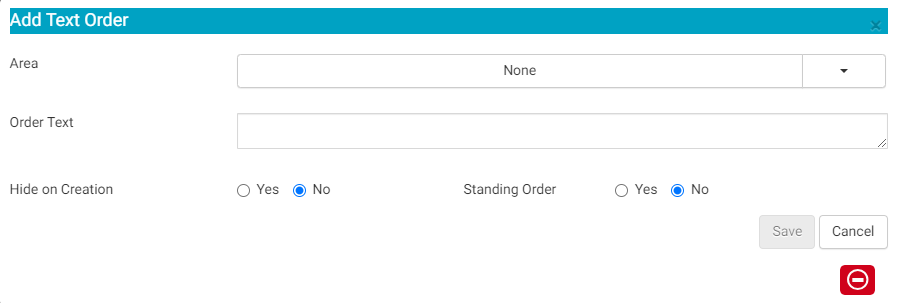
Area: From the drop-down menu, select the clinical Area for which the order will apply.
Order Text: Enter the desired order in the text box.
Hide on Creation: Selecting the Yes radio button will hide the order when the chart is created. Hidden orders can be viewed at any time by tapping the Show Hidden Orders button in the Physician or Anesthesia Orders BLOCs. The desired order can then be signed, and the remaining orders can be hidden again.
Standing Order: If the order is a Standing Order, select the Yes radio button. Orders should not arbitrarily be marked as Standing. The Center should have a Policy and Procedure for approving Standing Orders. CMS requires Standing Orders be based upon nationally recognized evidence-based guidelines. In addition, there are often state level regulations. Ensure that any order marked as Standing is compliant with relevant policies, procedures, and regulations. Generally, Standing Orders apply to all patients that meet the specified criteria. They are considered signed and executable. As such, Standing Orders cannot be hidden and should not be edited within a chart after the patient's arrival as the staff may have already completed the order as originally written.
Create a New Orders Template by Copying an Existing
New order templates can be created by copying an existing orders template. The medication and written orders will both be copied.
To create a new order template by copying an existing:
- Tap the Add button
 at the upper right-hand side of the Orders Templates page. A blank Orders Template will load.
 - Enter the desired order template name in the text field to the right of Order Name.
- Select the appropriate radio button for Anesthesia or Physician. If the order template is for a physician, enter the physician name in the search field below the radio button.
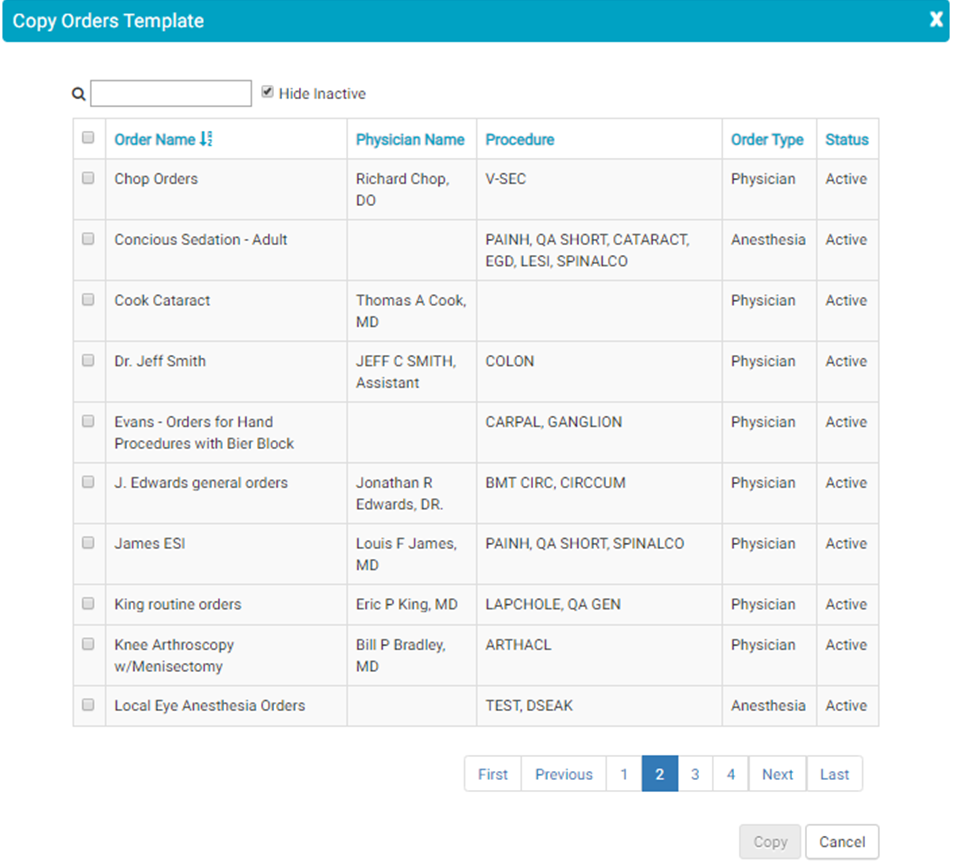
- Tap the Copy Template button. A flyout will open that lists all existing order sets.
- Check the box for the order set to be copied. Note: Only one orders set can be copied.
- Tap the Copy button. The medication and written orders from the copied template will appear on the new template.
- Rearrange, edit, delete, or add orders as desired.
- Tap the Save and Exit button.
Edit an Orders Template
Existing order templates can be edited to change an existing order, delete an order, or rearrange the order display.
- Navigate to Orders in eChart under Admin, Orders Designer.
- Locate the order template to be edited and tap the edit icon
 .
. - Make the desired changes and then tap the Save button. Individual orders can be deleted by checking the checkbox to the left of the order and tapping the delete button. Orders can be rearranged by dragging and dropping the order to the desired position. New orders can be added by following the same steps as adding an order to a new template.

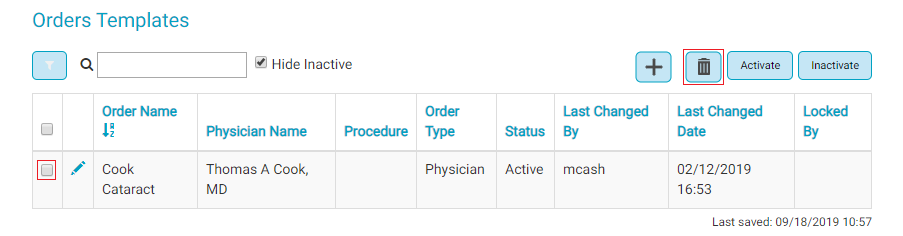
Delete an Orders Template
- Navigate to Orders in eChart under Admin, Orders Designer.
- Locate the order template to be deleted and check checkbox to the left of it.
- Tap the Delete button at the top of the grid. The Delete Orders Templates Confirmation flyout will appear.
- Tap the Ok button to delete the Orders Template.
Inactivate or Activate Orders Templates
Orders Templates can be inactivated so that the Template is not available for use, but the information is retained. Inactivated Templates can be reactivated for use again in the future.
- Navigate to Orders in eChart under Admin, Orders Designer.
- Locate the order template to be Inactivated or Activated and check checkbox to the left of it.
- Tap the Inactivate or Activate button at the top of the grid. No confirmation flyout will appear, but the Template will be inactivated or activated.